Waarp R66-Configuration

The primary installation of a server is done using the following steps:


1) Download the "All Jars Waarp R66" package from Downloads page

2) Create the XML configuration files (Server, Limit, Rule, Authent, SNMP). The minimal configuration is Server and Authent (eventually limited to the created server). An example of various configuration files can be found in the "Waarp R66 Configuration example" package. This package is an example and MUST be adapted to your needs. You can also have a look to the page Waarp R66-Options, which explains some specific options.

3) Create the necessary GGP (GoldenGate Password files) using the des Key generated both by Waarp Password

4) Create the necessary SSL KeyStore for the HTTPS Administration interface and another one for the SSL server authentication (server only, or server AND client, depending on your choices)

5) Create the database (dependent on the one choose between Oracle, PostgreSql, MySQL/MariaDB or H2 database, the initial creation is out of this documentation). We strongly recommend to use either PostgreSql or H2 Database, since MySQL, MariaDB and Oracle show some issues on client side using JDBC in multithreading case.

6) Adapt the example scripts that helps to launch the Waarp commands and services (in example/ then according to your OS: Linux, Unix, Windows). In particular for Linux and Unix, the file ENV_R66 shall be adapted to your installation, while for Windows, it is the setvari.bat. Note also that for Services (Waarp R66 or Waarp SpooledDirectory service), one should adapt the files found in /example/service (Waarp R66) and /example/servicespooled (SpooledDirectory).

7) Initialize the database (once created and the user/password and the JDBC access fill in the Server configuration XML file) (Note: JAVA 1.7 minimal requirement)

8) Create the logback.xml file according to your need (to setup for instance the level of trace from DEBUG to WARN). See the logback.xml example or the LogBack web site.

9) Now you can run the server and use the various commands or Administration interface to continue the configuration (Limit, Rule, Authent). Note that some specific options can be passed when launching the commands (see at the end the "-Dopenr66.*" options).

10) Note that commands can also have a special extra argument: the output format as one of

    • -csv : output will be as one line for the title, one line for the data, all fields separated by ';'

    • -property : output will be one value per line, as name=value

    • -xml : output will be in XML format

    • -json : output will be in JSON format (default)

    • -quiet : no output will be done (only logging)


Below those several steps are illustrated.

Note that the various tools are consolidated into one GUI named : Central Administrator (Xml Editor, Password, R66Gui) plus some other functions.


2) XML Configuration

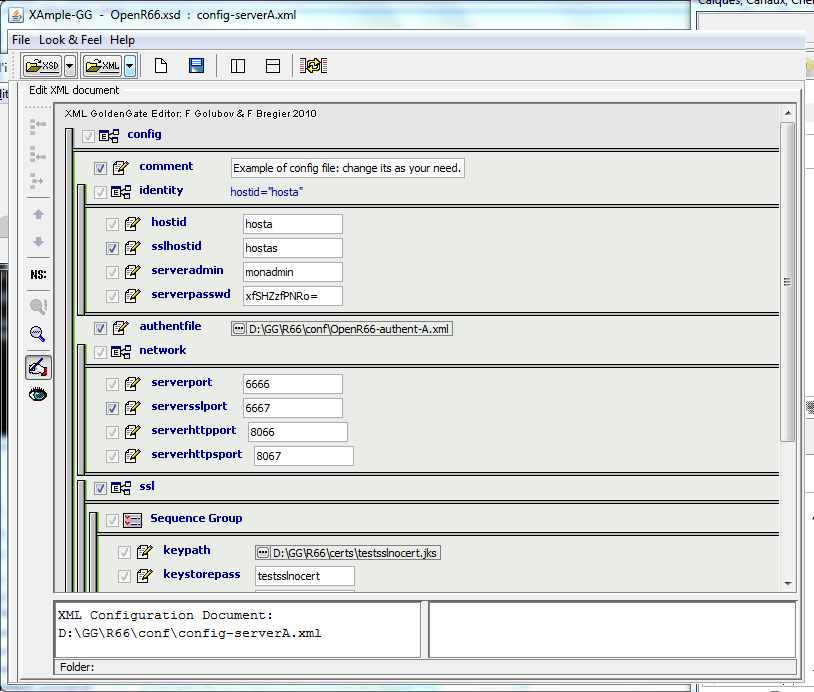
To configure a Waarp R66 Server, you need to first create the XML files as needed (see the Xml Config files page): main config file, authent file, rules and limit config files. To help the administrator to generate correct files, XSD models are defined to be used with an extension of the project Xample (XML Gui Editor) from Felix Golubov.

Note that the httpadmin shall specify the correct path for your choice of Waarp HTTPS/HTTP administrator/supervision tool. Now the default is i18n support based.


xample-config


It is also possible to use JAXE with jaxe-xxx-config.xml files.


3) Password configuration

For the administrator you need a specific DES Key for the crypted password support. DES crypted support and generation are available through the GoldenGate Password GUI project.
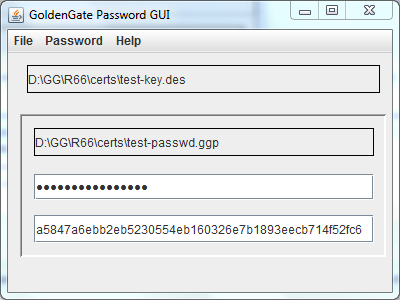
 

pwdgui2


Note that under Mainframe, some people reports that adding -Dfile.encoding=UTF8 fixes some issues with passwords.


4) Cryptography

For the administrator you need a KeyStore containing a RSA key for SSL support in HTTPS.


You need another KeyStore for the SSL support in the Waarp R66 protocol, but only if you want to use this SSL channel.

If you don't want that OpenR66 uses SSL between two hosts, then you only need one KeyStore for the HTTPS support.


In the source, you will find in the certs directory 2 such keystore named admin66.store and openr66.store. You can named the files as you wanted (using the standard "jks" extension for instance).

To generate those files, you can also ue the keytool command from the jdk, or using the cool free tool KeyTool IUI (last known version in 2.4.1).

  • keypath for OpenR66 channels (admkeypath for administrator) is the full or relative path to the keystore file
  • keystorepass (admkeystorepass) is the password for the keystore
  • keypass (admkeypass) is the password for the key

For instance: keytool -genkey -alias myalias -keyalg RSA -validity xxx -keystore mystore.store


Below you will find the full detail on how to create those KeyStore and TrustedKeyStore according to your needs:


To generate the stores for Waarp R66 for instance, you need to create 2 JKS keyStore. To generate those files, you can use the "keytool" command from the JDK or using the free tool KeyTool IUI (last known version in 2.4.1). Below we show how to use the Keytool IUI.

  • For SSL connection without authentication of clients
    • Server side (also valid for Administration HTTPS site)
      • Create one jks KeyStore (server.jks) with one Private Key Version 3 using RSA algorithm.
      • Use this KeyStore as KeyStore for the Server.
      • To do that, suing KeyTool IUI:
        1. Create an empty KeyStore
        2. Create a Private Key Version 3 with RSA algorithm added to this KeyStore
    • Client side
      • Create one jks TrustStore (clientTrust.jks) with the Certificate Chain of the Server Key from the Server as a Regular Certificate.
      • Use this KeyStore as Trustore for the Client.
      • To do that, using KeyTool IUI:
        1. From the Server Keytore, export Private Key (2 files with one Certificate Chain)
        2. Create one jks TrustStore (Empty KeyStore)
        3. Import the Trusted Certificate as Regular Certificate (Certificate Chain as .der file)
  • For SSL connection with authentication of clients
    • First do as without authentication of clients for the server authentication side: server.jks for the Server's KeyStore and clientTrust.jks for the Client's TrustStore.
    • Handle the reverse authentication of multiples clients within the server
      • Client side
        • Create one jks KeyStore with one Private Key Version 3 using RSA algorithm for each Client (client1.jks, client2.jks, clientn.jks).
        • Use this KeyStore as KeyStore for the Client.
        • To do that, suing KeyTool IUI:
          1. Create an empty KeyStore
          2. Create a Private Key Version 3 with RSA algorithm added to this KeyStore
      • Server side
        • Create one jks TrustStore (serverTrust.jks) with the Certificate Chain of the Client Key from the Client as a Regular Certificate.
        • Use this KeyStore as Trustore for the Server.
        • To do that, using KeyTool IUI:
          1. Create one jks TrustStore (Empty KeyStore)
          2. From the Client Keytore, export Private Key (2 files with one Certificate Chain)
          3. Import the Trusted Certificate as Regular Certificate (Certificate Chain as .der file)
          4. Import all Trusted Certificates as with 2 and 3 in the same TrustStore


Then you have to fill the ports to use (serverssl port for Waarp R66 channels, serverhttpsport for the administrator) and to set up the good path to every components (don't forget the path to the html admin files, between admin or admin2 - the second being more dynamic - ).


7) Database configuration

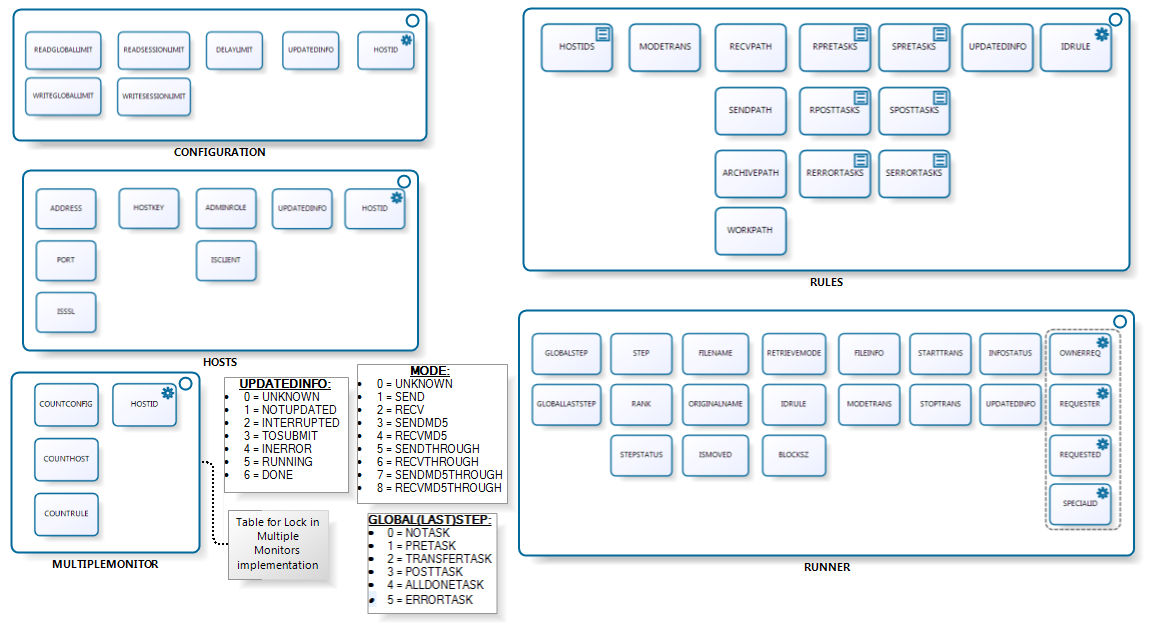
Then, you create a database entry in the model you choose (currently supported is Oracle, PostGreSQL, MySQL and H2 Database). This database entry should be referenced in the XML config files. Below is presented the schema of the database that will be created.

openr66-database

You need to get all the necessary jar (see the depencies of the project) to allow you to launch the server. An example of shell script including all jar is presented in the src/main/example directory.


Then you launch the ServerInitDatabase.


Note that multiple Waarp R66 Servers may shared the exactly same database. Waarp R66 is compatible with such a model. Note however that Rules are strictly shared, which means that you will need to take care of the absolute path of EXEC commands such that they are valid on all Waarp R66 servers where it should be executed.

Note also that from version 2.4.17, it is possible to update the database schema using ServerInitDatabase -updateDb.


8) Example of logback.xml file

<configuration>

  <appender name="FILE"
    class="ch.qos.logback.core.rolling.RollingFileAppender">
    <file>/GG/R66/log/R66Server.log</file>
    <append>true</append>
    <rollingPolicy class="ch.qos.logback.core.rolling.TimeBasedRollingPolicy">
      <fileNamePattern>/GG/R66/log/R66Server.%d{yyyy-MM-dd}.%i.log.zip</fileNamePattern>
      <maxHistory>30</maxHistory>
      <timeBasedFileNamingAndTriggeringPolicy class="ch.qos.logback.core.rolling.SizeAndTimeBasedFNATP">
          <maxFileSize>10MB</maxFileSize>
      </timeBasedFileNamingAndTriggeringPolicy>
    </rollingPolicy>

    <encoder class="ch.qos.logback.classic.encoder.PatternLayoutEncoder">
      <pattern>
        %date{dd/MM/yyyy/HH:mm:ss.SSS} %level [%logger] [%thread] %msg%n
      </pattern>
    </encoder>
  </appender>

  <appender name="STDOUT"
    class="ch.qos.logback.core.ConsoleAppender">
    <encoder class="ch.qos.logback.classic.encoder.PatternLayoutEncoder">
      <Pattern>%date{dd/MM/yyyy/HH:mm:ss.SSS} %level [%logger] [%thread] %msg%n</Pattern>
    </encoder>
  </appender>
 
  <root>
    <level value="warn" />
    <appender-ref ref="FILE" />
    <appender-ref ref="STDOUT" />
  </root>
</configuration>

And use the -Dlogback.configurationFile=J:/GG/R66/conf/logback.xml as argument to the java command (before the class to launch, roughly were you put the -Xms -Xmx arguments).


9) Extra Waarp JVM Options

Moreover, several options can be placed in the command line (preferably in ENV_R66 or setvari.bat):

  • -Dopenr66.locale=en|fr to choose between english or french default language (note: not all elements are translated, only the more relevant)
  • -Dopenr66.ishostproxyfied=1|0 to set that this host is proxyfied (using R66Proxy), such that eventual IP check will not apply to it (since the IP will be the one from the proxy)
  • -Dopenr66.startup.warning=1|0 to choose if warning at startup should be printed or not (useful for client where those warning are not real issues but information)
  • -Dopenr66.startup.checkdb=1|0 to choose if database configuration shall be checked at startup (default is true)

  • -Dopenr66.chroot.checked=1|0 to choose if all rules will have to be respected in terms of chroot. For instance, trying to get a file (RECV) from a remote partner, while specifying a full path might be allowed, even if outside OUT directory, except if checked=1. Then all files must be under (immediately or in subdirectories) the OUT directory.
  • -Dopenr66.blacklist.badauthent=1|0 to choose if a server that will have a bad authentification will be put as black listed (no more allowed for a while), to prevent DOS. if OPENR66_ISHOSTPROXYFIED is true, then is mandatory false). Note that this must not be true if several partners might have the same IP (proxyfied for instance), since they will all be banned
  • -Dopenr66.filename.maxlength=n (default n = 255) to choose the default max filename length used when receiving a file (for the temporary filename and final filename). This does not prevent to change the filename after (and #ORIGINALFILENAME# does still contain the full filename, untroncated).

  • -Dopenr66.trace.stats=n (default n=0) to debug by making a trace of some specific data structure usages every n s, where n is specify as value in the definition. If 0 or less, means not activated.

  • -Dopenr66.cache.limit=n and -Dopenr66.cache.timelimit=m (default n=20000, m=180000 - 180s -) to manage the cache behavior of Transfer informations with

    • n being the maximum number of DbTaskRunners to keep in LRU cache (used in self request and for instance without database) - Minimal value is 100 -

    • m being the maximum time in ms of valid element once created, used or updated (used in self request and for instance without database). - Minimal value is 1000 ms (1s). If set to 1000, the value will not be regularly cleaned of outtimed values but the cache will be filled up to n. -

Now you can launch the Waarp R66 Server.


Note that you can add specific user rights with specific authentication to access to the Web administrator interface from version 2.4.22 (see here), in addition to the super user specified in the XML configuration file of the server.